The tools we used for converting a 2017 Ram Promaster 2500 into a camper van
Building a van is intimidating. Building a van without any prior knowledge of building anything can seem impossible. Hopefully, this quick guide can help alleviate some of that initial anxiety by providing some information on tools we used while constructing our van.
For the sake of transparency: This article includes affiliate links. I will never provide links to items I would not purchase.
It turns out, even researching tools can be a hassle. There are so many specialty items that aren’t exactly essential to the build process. I’ve dug through info while working on my own build, so I’m sharing a list of the main tools used during the construction portion of the build. It’s a pretty scant list, but this proves it’s possible to do this project without spending a fortune on tools. But it’s important to factor these items into a build budget and recognize when a tool isn’t strictly necessary. Don’t forget the tools can be used for more than just building a van and should last a lifetime if properly stored and cared for.
Quick tip: If using cordless tools, try and buy the same brand of tools so the batteries are swappable among the tools.
First and foremost, saws are crucial to the van build process. Try not to be too nervous. Watch some videos regarding the safe use of every tool. Steve Ramsey’s Woodworking for Mere Mortals YouTube channel is a wealth of information.
Circular Saw

Having a circular saw handy will help break down any large pieces of plywood or OSB sheets. With the appropriate clamps and work space, it can make a table saw more of a luxury than a necessity. In fact, while building Edith, we only borrowed a relative’s table saw one time to cut the butcher block counters to size. A cordless saw will provide you with all the power you need to work throughout the day. It may also be necessary to pick up an extra battery or two in order to make it through a full work day.
Miter Saw

Also known as a ‘chop saw’, the miter saw is an excellent tool to become familiar with. It’s a specialized saw with a blade on an arm that can be positioned to create angled cuts reliably, accurately, and quickly. My favorite use of the miter saw involved making numerous cuts of the same length. Unfortunately, this wasn’t a common scenario during the build. But using a stop block with the miter saw proves to be rather efficient.
The miter saw was invaluable during the installation of our cedar walls and ceiling. Setting the angle of the cuts also allows for adapting to the curve of a van to make sure cabinets and things are mounted properly. For instance, we had to take the curve of the van into account when making cabinets. We mounted some studs on both the wall and the ceiling and created some 90 degree elbows to act as a frame. Cutting the ends at angles ensured the frame fit snugly against the studs.
Jigsaw
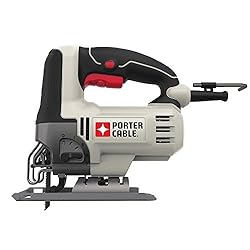
The jigsaw is one of those tools that seemingly has a million uses. Any time a cut involves a curve, a Jigsaw is going to be the best bet. Most notable uses during the van conversion include the installation of the windows, Maxxair ventilation fan, and the kitchen sink. It’s one of the more crucial tools for the build. I personally purchased a cheap one from Harbor Freight that became difficult to use after a couple of times. I’ve done some additional research and found a great value Jigsaw that I want to add to my collection. The Porter Cable Jigsaw even has an option for a bluetooth speaker. I can’t say that would be particularly useful, but there you have it.
Corded Drill

Recommending a corded drill here may seem odd. However, there are times when things need to be securely fastened to the metal body of the van. Doing this with a reliable power source will help prevent many frustrations. The extra leverage you gain with the secondary handle will prove useful as well. Pair it with some decent drill bits so the metal feels more like poking holes through butter. A good drill will also be used for installing windows, ventilation fans, cabinets, flooring, etc. We even used ours to help remove the partition from the van. Turns out, Promaster vans include a partition secured via rivets. The only option was to drill through the rivets in order to remove the partition entirely.
Impact Driver

The impact driver isn’t 100% necessary to get the job done, but I do recommend having at least 2 tools for the job. The first one to drill with a drill bit and another tool with a screwdriver bit. This set up will be a big time saver. The impact driver also has the benefit of helping you fasten things to the body of the van if needed. Using self-tapping screws with the hammering action of the impact driver really makes things easier.
Oscillating Tool

A sander for finishing surfaces, an off-set saw for tough to reach places and plunge cuts, and a grinder. The oscillating tool is one of the most-used tools for Edith. I recommend purchasing a battery powered one and an extra battery. It was used for installing counter tops, installing the sink, removing excess insulation during the window installation, and making odd cuts. Don’t overlook this multi-tool.
Pocket Hole Kit

I’m pretty sure Kreg has a jig to help get your life back on track. Seriously, they make a jig for just about anything. One of the more useful jigs has to be the pocket hole jig. Using pocket holes and pocket screws will create a great joint when combined with some wood glue. I would try to list the number of times it was used in this project, but I’m trying to keep posts well under 20,000 words. The biggest use is cabinet making by far. If you have the right screws and plywood thickness, it will even help with drawer assembly.
The one downside to using pocket holes for everything is that it really works well for joining something 3/4″ or thicker. The plywood we went with in most cases was 1/2″ and sometimes screw heads will poke out. Be careful with that.
Work Table

For the first couple of weeks, my wife and I spent time squatting and kneeling to make every cut. The miter saw was set up on the ground and that showed us that we aren’t spring chickens any longer. Invest a couple of dollars in a table that can be dedicated to working with messy projects. Saw blades, drills, and everything in between will inevitably find a way into the work surface. It can even be a good surface for painting.
Related: It’s also useful to purchase some extra foam board insulation to rest boards on while cutting them. If pieces have no support underneath, the saw blade can get jammed or the off-cuts can break off before you expect it. Having some support can prevent money loss by reducing the odds of ruining a piece of material. I’ll refer you to Steve Ramsey’s How to break down plywood video.
Bonus: Table Saw
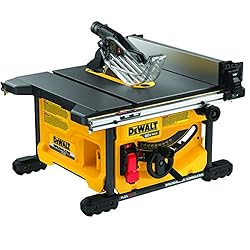
This is the only tool on the list that I don’t own. The reason I’m recommending it: I wished several times during the build that we had one. I’ve done some additional research and found a cordless (what?!) table saw that gives accurate cuts and portability. It would have made cabinet and drawer building a breeze. The price was a bit outside of the budget for us at the time, but it feels like it would have been worth it. As mentioned before, though, a circular saw can achieve the same results with some clamps/edge saw guides.
Did I forget something obvious? Maybe a tool that is costly but provides a lot of value to the build process? Let me know in the comments below!

Pingback: Van Conversion: Building Simple, Custom Cabinets – Just Edith